Followers

Thursday 25 April 2013

Recent Reading

I've been rather busy in the reading room recently.

I started with this one hoping to find terrific tales of Roman Legions disappearing without trace north of the highland line. This story is a wee bit different.


Next I moved onto the bigger Roman picture.


Third up was the same story from a greatly different (Eastern) perspective.


Finally a story to cap it all.


So, there is a bit of disjointed tale in here.

Can anyone figure out where I'm going next and that includes on the painting table as well as the wargames table?

Thursday 18 April 2013

Fantasy Basing

I've always fantasied about writing my own fantasy rules (again).

If I had a terrain system I maybe would do so again.


What's this? Oh, it's hex shaped and about 100mm across, and covered with static grass. This could be handy if I had a few of them!


Oh, I do have a few more of them. This could get interesting.


This soldier lad looks like he needs some company.


Here they are! Come on lads, get into line.


That's better, eyes front!

It would be better if you lads could stick together then I wouldn't have to pick you up one at a time when I want you lot to move somewhere else.


What's this. It's not a hex although its got some of that static grass stuff on it.


Hey, get off that, you'll find your base stuck to it.


That's it, monkey sees, monkey does.


Wait a minute, you all fit on there, nice and neat! Now turn around.


That's it, you all turned together and stayed nice and neat.

Hang on a sec', what's that little hole at the back for?


Oh, I get it, these little red cubes fit in just nicely.


I wonder what they are for?

Right you lot, turn together until you can't see me.


That's fine, now turn again until you can all see me.


That's not quite what I mean't but never mind. I've got some thinking to do! Dismissed!!

Tuesday 16 April 2013

Breaking Painters Block

I tried an experiment in an attempt to break my Painters Block which has halted my efforts to bring another six regiments of my Spencer Smith ACW regiments to battlereadiness.

Going to another extreme I decided to paint just one figure instead of a batch of one hundred and fifty. I also selected a reasonably complicated figure instead of a simple figure in the toy soldier style.

Here is how I got on over 3 days of a few short painting sessions.


For those of you not in the know this is Sergeant Gideon of the Blood Angels. Note I have added to the supplied base to make it more stable, essential in a gaming environment.

Have I broken the Painters Block, time will tell. I have another twelve figures similar to the Sergeant to fit in.

Wednesday 10 April 2013

Can't see the Wood for the Trees

The final stages of the scenic elements on the tree bases are complete. The evidence is presented below.


Here we have a selection of large water rounded boulders and a patch of railway modellers ballast. These are glued down with the hybrid glue I mentioned earlier which holds them fairly solidly and dries quite quickly although I do leave them overnight.


Here I have used a sharper edged set of boulders as well as more railway ballast.


This I think is 'budgie' grit and not a feather in sight. I drizzle polystyrene cement over the tops of all these scenic patches and this finally secures them to the bases. We don't want bits coming off as they are painted or even when in use on the tabletop. Again I leave these overnight to make sure the glues have fully cured. PVA and other white glues could be used as well as contact adhesives, in fact any glue you are familiar with could be used as long as it is dry before painting.


I paint the entire base with a beige coloured shade although you could use any lighter shade which blends in with your tabletop colour scheme. Make sure you get all the nooks and crannies covered as this will help with the ink wash stage later. It doesn't do any harm to paint part way up the tree trunk at this stage.


Some of the tree trunks were enclosed in brown PVC tubing by the maker whereas some had bare twisted wire showing. I covered those with a few strips of masking tape and a coat of contact adhesive. This all adds to the resilience of the model.


All your bases will be unique especially if you model the plaster coats differently, vary the patches of gravel and ballast and even the wrinkles in the masking tape will help the illusion.


The next paint stage is to brown coat the tree trunks, a middle brown will do and green the edge of the base if that is your style. Some wargamers try to emphasize the edge whereas others try to disguise it.


My style here is to wash the entire base including the tree trunk with a brown ink. I use Windsor & Newton Nut Brown ink but you may have your own favourite. Make sure this fills all the nooks and crannies as it will add a depth of shading which helps enormously.


Again I leave the ink to dry overnight as the last paint stage will be spoiled if any of the ink remains wet in the pooling areas. I dry brush in white although any light colour will do the tops of the boulders, gravel, ballast and sand. This further enhances the illusion of shadows here and there.


Lastly I matt varnish the trunk and the base to get rid of any remaining shine. I use Windsor & Newton Artists Matt Varnish almost to the exclusion of any other matt varnish. It has never let me down.


Definitely the last stage now. I apply static grass in selective patches on the bases, leaving some of the boulders and ballast showing with PVA white glue.


I use a static grass to match my Hexon II terrain set which unfortunately was not on the tabletop when I took these pictures. For those of you who wish to disguise the edge of your terrain pieces you want to bring the static grass right down over the edges of your bases.


Finally you can see the whole lot together makes one 'L' of a wood.

Monday 8 April 2013

One, Two, Tree Bases

Now that I've cut all the tree bases and glued them together it is time to scenic them.


Here they are in all their temporary glory. First thing I did was to add a layer of self adhesive magnetic tape under the base. I will be storing these trees in a 4 litre Really Useful Box lined with steel paper.


I put a touch of polystyrene cement on the upper surface of the PVC base. This should help the plaster coat to adhere firmly. I cover the base with a thick layer of ready mixed plaster.


I leave some of them quite smooth. All the bases will get some additional texturing using fine gravel, ballast and sand once the plaster layer is dry.

Tuesday 2 April 2013

Trees without bases sorted out

During my recent de-cluttering of the wargames hut I came across a box of trees, the flocked twisted wire variety. I do not recall how I came to have them, probably a donation from a friend so perhaps cost me nothing.

The downside was that the trees had no bases!


While I am stuck with Painters Block I thought I would have a go at basing them. Here is how I did them.


I cut some 50mm squares from a gray PVC foam board which I get from eBay.

http://www.ebay.co.uk/sch/i.html?_trksid=p5197.m570.l1313.TR0.TRC0&_nkw=A4+3MM+GREY+FOAM+PVC&_sacat=220&_from=R40

I have no connection with the seller.


I round these off using a combination of snips, a coarse file and sandpaper. I also drill a pilot hole in the approximate centre to be enlarged later. I also make another set about 35mm square and round them off too!


I enlarge the central holes with a larger drillbit until the twisted wire trunks fit in with a little bit of persuasion.


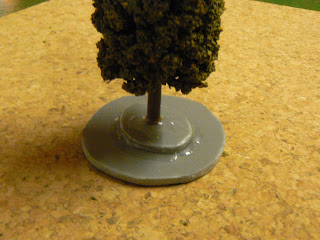
 I then glue the two bases together with the holes lined up and then I insert the trunks into the hole using a twisting motion and the twisted wire trunk will make a good firm connection. Make sure you don't go right through or the tree will wobble on its base.

I make sure the base of the trunk is well coated with glue as this will strengthen the join as well as adding a bit of irregularity to the trunk.


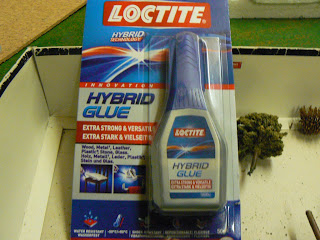
This is the glue I used, from a local hardware store. It take a few hours to dry but makes a very strong bond that will last forever. It also takes acrylic paint nicely.


As you can see the trees rank up nicely together and their bases will receive a scenic finish in due course. I did 9 trees while watching some Youtube movies as a touch of therapy while trying to pluck up the courage to attack my Painters Block.